

Wouldn’t the TiVo sliding keyboard remote be great if you could use it with Windows Media Center? Well now you can have all of that keyboard goodness and still use the best DVR on the planet: Windows Media Center. Let us show you, step-by-step, how to configure this keyboard + remote with Media Center.
One benefit is obvious: it has a built in keyboard. There are many other benefits and even some drawbacks to using a TiVo Slide remote with Media Center, so we’ll cover those first.

Advantages
- Bluetooth. No need to point the remote towards the TV when pressing buttons (except power and volume, unless you blast the volume codes with an IR Blaster)
- Speed. Compared to my old Logitech Harmony 650, the TiVo Slide is extremely fast. There is pretty much no lag between button presses unlike the Harmony’s pause between IR blasts.
- Keyboard. This one is obvious. Any time you need to type something in to either search for something or jump down the list of recordings, movies, etc., you can just start typing it in instead of pretending you are using a cell phone from the 90s.
- Reprogramming buttons is very flexible using the step-by-step guide below.
- Good Range. The range is approximately 30 feet.
- Buttons are pretty well laid out and you should be able to distinguish them without looking.
- Buttons are back-lit when it is dark and you press a button.
- Price. At the time of writing this article, the TiVo Slide remote is around [amazon_link id=”B003YKFKR6″ target=”_blank” container=”” container_class=”” ]$40 on Amazon[/amazon_link].
Disadvantages
- A lot of the standard Media Center buttons are not there (or labeled how you want them to be) by default. Almost all buttons can be reprogrammed using software, but if you have guests over to your house all the time that use your remote, this may not be the perfect remote for you.
- Programming the buttons can take some time—it may take some trial and error to get all of the buttons programmed the way you want them.
- It is a little heavy, but most people will probably just think it feels solid, and it won’t bother them.
Step-By-Step Guide
Pair the remote with your HTPC
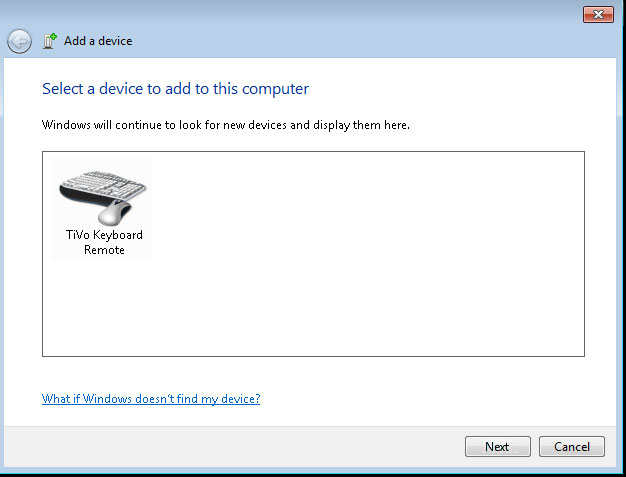
Ensure there are batteries in the Slide Remote, then plug the included Bluetooth dongle into a USB port (I highly recommend using the included USB extension cable and placing the receiver in plain sight to increase your Bluetooth signal strength). If you already have Bluetooth on your HTPC, you should be able to use that instead. Wait for Windows to recognize the dongle. Once it does, (1) right-click on the Bluetooth icon in your task bar and (2) choose Add a Device.

Put your TiVo Slide into discoverable mode by holding down the TiVo button and the blue B key on the remote until the blue light starts flashing. It should instantly pop up on the computer. Select it and choose Next.
Once the remote is paired properly, you should notice that the keyboard and most of the buttons will already work. But we will need to customize some of the buttons to do what we want.
Download and Configure the Key Remapping Software
Download and install the free version of LM Remote KeyMap. There is also a donor’s version that provides more features, but the free version does all that we will do in this guide.
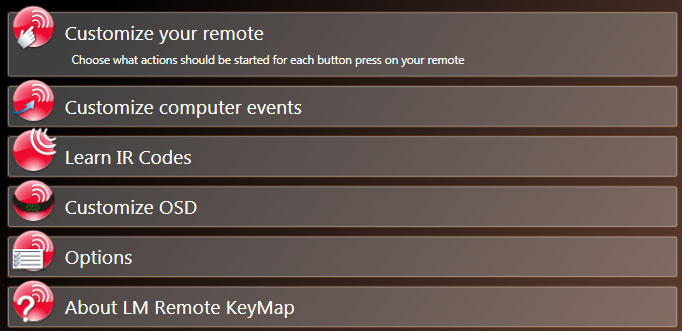
Once it’s installed, open up the LM Remote KeyMap software. The first thing you want to do is click Customize your remote.
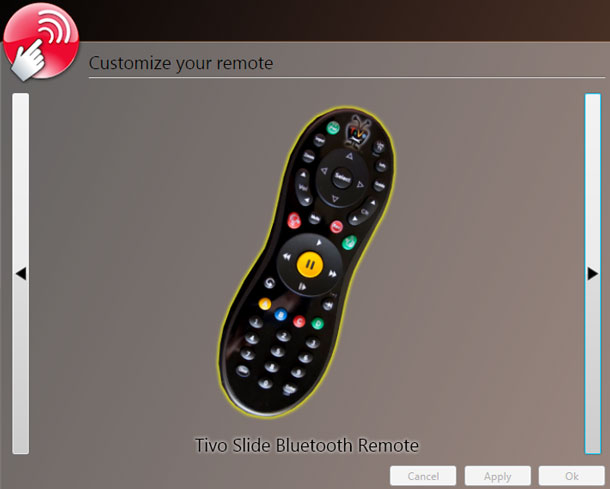
Scroll through to find the TiVo Slide Remote and click it.
LM Remote KeyMap allows you to create different profiles for different applications you may want to use. That way different buttons can do different things, depending on the circumstances. Assuming you pretty much only use Windows Media Center on your HTPC, we’ll walk through editing the default profile. Click Edit for the Default profile.

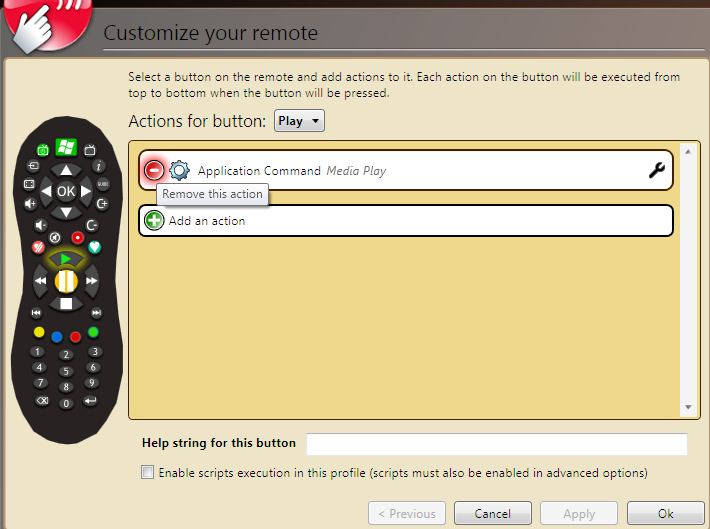
You will then see an image of the TiVo remote on the left side and the action list on the right side. You can press a button on the remote itself to select the button, or you can click the button with your mouse.
Fixing the “Double-Tap” Problem
By default LM Remote KeyMap tries to assign commands to all of the buttons. There is a problem with this however. You will notice that some buttons will “double-tap” when you press them. For example, when you press the Play button Media Center responds to the play button even without LM Remote KeyMap’s command. Since Media Center picks up on the button press and LM Remote KeyMap sends it, you will notice that if you are watching something and press Play it will show the progress bar very briefly and then it will disappear. What is the solution? Simply click the Remove icon next to the commands in LM Remote KeyMap for those buttons exhibiting this behavior. Your experience may vary but I believe the buttons that are affected by this are Play, Pause, Record, Rewind, Fast Forward.
Set up a Green Button
By default there is no Green Button for Media Center, but you can program whatever button you want to be the Green Button. I programmed the TiVo button on the top of the remote and the Like/Thumbs Up button to act as the Green Button. After selecting the button you wish to program follow these steps:
1. Remove any other commands and then click Add an action. Then find the Key Down action type, select it, and then click Ok.
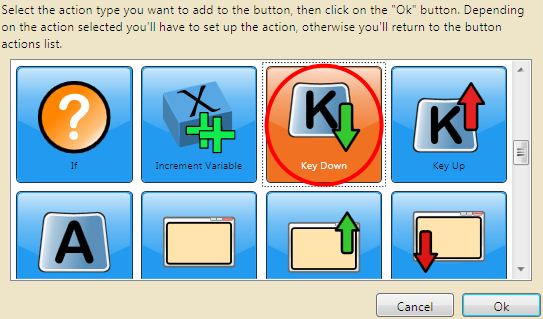
Next: locate the LeftWindows option in the Virtual Key Code list and select it.

2. Repeat step 1 above and select LeftMenu (alt key).
3. Repeat step 1 and chose Return.
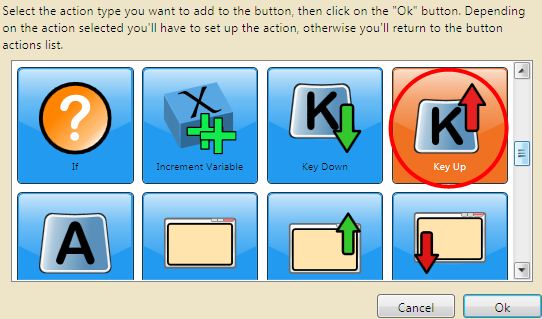
4. Now add Key Up actions for all of the same keys (I did it in reverse order, but I’m not sure if that is necessary).
After adding the Key Up actions for all three of the keys, your actions screen should look like this:

Click Apply, then press the button you just finished programming on the remote. It should launch Media Center. If you want to program another button to be a Green Button, just follow these directions again for the other button.
Set up a Back Button
By default there is no back button on a TiVo remote. This was a major concern of mine, but I am really getting used to using the red Thumbs Down button. This is very easy to program. Simply choose the button you would like to program, remove any previous actions assigned to the button and click Add an action. Find and select the Application Command action type and click OK. (You may also be able to use the Press Key action type as there is a BrowserBack key code as well.)

Select the Browser Backward command and then click Ok.
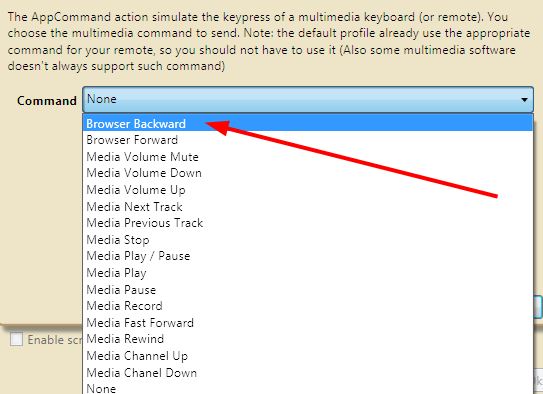
You could technically also send a Backspace keypress, but the Browser Backward command is more universally supported by other applications.
Set up the Info Button
You will need to program the Info Button for Windows Media Center. Select the info button and click Add an action. We will use Key Down and Key Up actions. First find and select the Key Down action type:
Then select Menu in the Virtual Key Code list.

Then do the same thing for the Key Up action. Find and select the Key Up action type.
Then select Menu again in the Virtual Key Code list.
Apply the actions, and the Info Button should now work as expected in Media Center.
The Skip Buttons
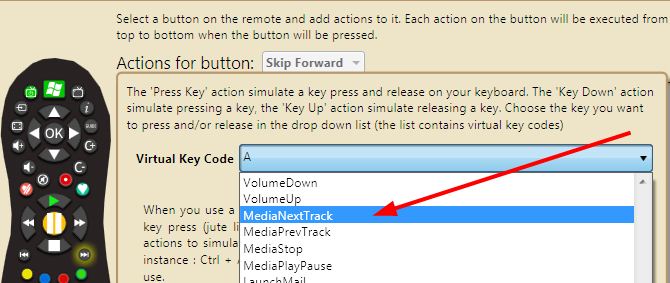
While the skip buttons seem to work find in Media Center, if a 3rd party add-in monitors for those buttons, they don’t work properly for the add-in. By default, LM Remote KeyMap sends the Media Next Track application command.

Remove the Media Next Track action and click Add an action. Find and select the Press Key action type and click Ok.

Then select MediaNextTrack in the Virtual Key Code list.
Repeat this step for the Skip Back button as well, selecting MediaPrevTrack.
Programming Other Buttons
The TiVo remote has 4 colored buttons that you can program to do whatever you want. Since there are no buttons for Live TV, Recorded TV, Pictures, Videos, and Music, you could program the ones you want to those colored buttons. For some reason the Clear button on the bottom left corner of the remote also doesn’t work, so if you need a clear button you will have to program that to one of the colored buttons as well. Here are some keyboard shortcuts you can use:
| Live TV | CTRL+T |
| Recorded TV | CTRL+O |
| Pictures | CTRL+I |
| Videos | CTRL+E |
| Music | CTRL+M |
| Complete list of shortcuts | |
I’ll let you try to figure out how to program those on your own. There are multiple ways to do it, but I’ll give you a little hint: use Keystroke actions.
Programming the Power and Volume Buttons
Another nice thing about the TiVo Slide remote is the ability to power on and off multiple devices at once! If you have a TV and a Receiver this is a great remote to use. TiVo provides instructions on how to program the Power and Volume button.
You can also try to program it by using the manufacturer remote codes. Ignore the instructions for rooting around TiVo’s onscreen menus and go straight to the section that talks about doing it on the actual remote itself.
Note: If you want to power up/down multiple devices that are connected via HDMI, you are probably better off using HDMI-CEC (if built into your TV, Receiver, etc.) to power up and down. I’ve got it setup through my Panasonic TV that when I power on the TV it should power on the connected components and power off when I turn the TV off. That makes it so I only have to program the power button to control the TV and I don’t have to worry about them going out of sync.
You cannot program the power button through LM Remote KeyMap, but you can program the volume buttons. The TiVo Slide remote actually sends out both an IR command and a Bluetooth command when you press the volume buttons, and since I don’t always want to be pointing the remote at the TV when I change the volume, I’ve programmed my volume buttons to blast out IR to my receiver to change the volume.
You will need a Windows Media Center IR Blaster or a USB-UIRT Blaster to be able to program it through LM Remote KeyMap. I have an HP Media Center IR Blaster that I use. I won’t go into detail on how to do this, but it is very simple. On the Main Menu in LM Remote KeyMap, choose Learn IR Codes and simply follow the directions to create the blast commands you want. You can then program the buttons on your remote to send those IR commands when the button is pressed.
Hint: You will probably want to play around with the Blaster Options and adjust the duration of the blast and the number of times the blast is repeated to fine tune it for each device you will be controlling.
Those are the Basics!
Don’t be afraid to play around with the different options that LM Remote KeyMap provides. It is extremely versatile and very user friendly. If you enjoy the software and/or can make use of the extra features in the donor’s version, support the developer by donating! And if you learn any tricks that help make the TiVo remote work better in your Media Center environment, please share them in the comments.


anyone have experience “mousing” with the d-pad on this remote?
Thanks,
Andy
Thanks for the article!
I had one problem on my Win7 x64 machine, though…it would freeze during the “Add a Device” step. Its not addressed here, but I finally found the answer: open “Devices and Printers” (right panel of the Windows Button menu), double-click your USB Bluetooth device (the one included w/ the TiVo Remote is listed as “Broadcom Bluetooth 2.1 Device”), and check the “Allow Bluetooth devices to find this computer” box. Worked super-quick after that (0000 for the bluetooth passcode); don’t forget to uncheck this box when done (for security issues).
Just installed this last night on my HTPC, which is running Win7 x64, and like D H posted, you need to check the “Allow Bluetooth devices to find this computer” box. Unlike D H though, I had to pair without a pass-code (third option down) on the pairing menu.
[…] tightly-integrated third-party experiences, GetGlue integration, and the future of our favorite TiVo Slide remote—all of which were met with polite roadmap responses. Hey, we had to ask, […]
I would simply like to use my TiVo remote to control windows media center volume level. Anyone know a universal remote code that will work for this?