


Smartlabs’ recent demise and the resulting shutdown of its cloud services has Insteon customers scrambling. With no notice whatsoever, Insteon users found themselves with seemingly dead smart home products. One of these products—the Insteon Ceiling Fan Controller—is among the few smart fan controllers available to consumers today. Customers who relied on their apps alone to control their fans might feel out of luck. If you’re in this camp, know that it doesn’t have to end like this. Your Insteon Fan Controller (a.k.a. FanLinc) isn’t dead—your hub is.
So what’s the difference? The Insteon Hub is required to use the Insteon apps, to set and run schedules, and in some cases to configure Insteon product settings. But before you go ripping out Insteon devices around your home—particularly those that are hard to replace in kind—take a moment to evaluate your needs.
What Are Your Needs?
Do you need voice, away-from-home, or timed/scheduled control? If so, you may want to consider one of the alternative systems Insteon customers are turning to now. Universal Devices‘ ISY or Polisy, Home Assistant, Homebridge, HomeSeer, and others will all bring new life to your Insteon devices. Kevin Tofel has a good write-up summarizing your options over at Stacey on IoT.
But do you? Do you really? Or do you just need to control your fan, somehow, from inside your house? Insteon devices, by design, can be grouped or paired to work together without an app or a hub. So if you have an Insteon device you’re not using—a keypad, remote, or switches—you could pair one or more of those with your fan controller manually.
What’s on the Wall?
If you’re in the situation where you can’t control your fan at all now, that’s likely because you don’t have a wall switch for it. This should be pretty rare, though. Code in many jurisdictions requires that ceiling fans be controlled by a wall switch or at least have a wall-switch cutoff. If you have a wall switch for the fan, you can’t use it to control the speed or adjust the light of a fan using the Insteon Fan Controller. So let’s address that situation first: replacing a standard fan on/off switch.
You’ll need an Insteon Keypad. Any Insteon Keypad will work—the on/off relay and dimmer versions. Six-button keypads work best, because you’ll need buttons to dim or turn the light on and off and buttons to adjust the fan between three speeds and off. Smarthome.com even used to sell pre-programmed keypads and button sets for this very purpose. But you can program it yourself.
Setting up a Keypad
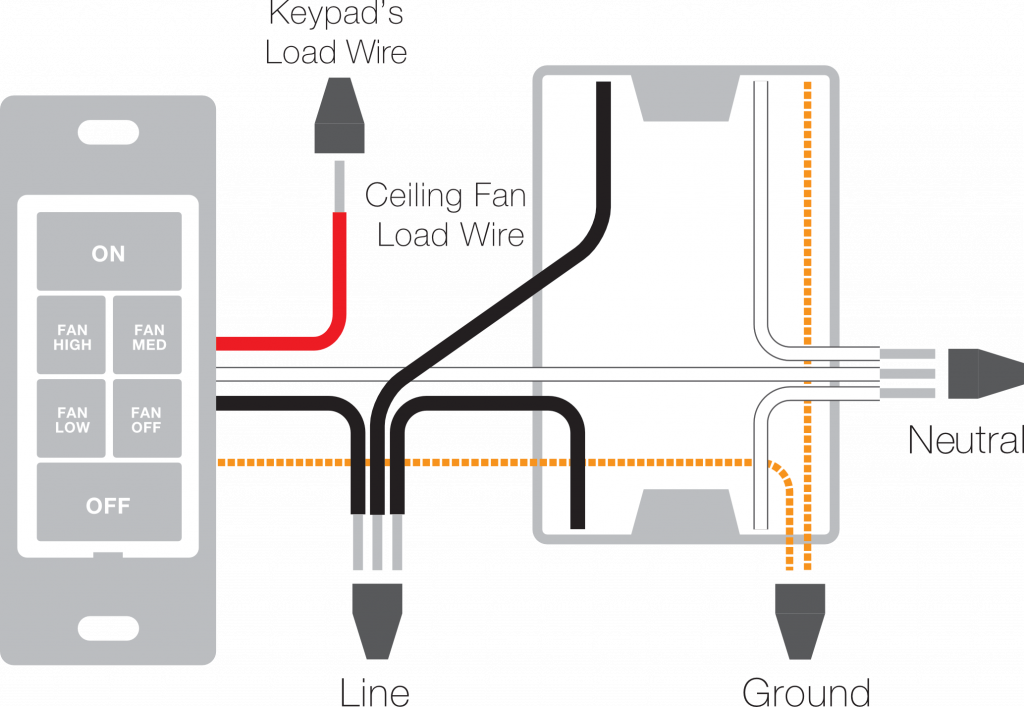
You’ll want to install the keypad in place of the fan’s original switch. For this type of installation, you’re basically using the wiring in the switch box to permanently power both the fan and the keypad. The keypad will not physically control the power to the fan. As always, turn off the power to the fan and the switch box before doing any electrical work. This diagram from Insteon’s Fan Controller FAQs shows you how to wire the keypad:
Once that’s wired up, you’ll need to pair the keypad with the Fan Controller for it to work. This is the rough part. First, make sure your electricity is back on. Next, you’ll need to gain access to the set buttons on your Fan Controller installed inside the canopy of your fan. Ensure that your fan is off before doing this.
Start with pairing the light with your keypad’s on/off buttons (or whichever keypad button you designate if you’re using an 8-button keypad). This is fairly straightforward. If you’re familiar with tap-linking Insteon devices, you’ll put your keypad button in pairing mode first, then the Fan Controller light. You can also get tricky with setting the preferred dim level and ramp rate when you’re pairing with your fan light, but we won’t go into that here. Follow these instructions from smartlabs to pair with the light:
1) Press & hold the scene controller button until it beeps. Controller LED will blink
2) Tap FanLinc light set button until the ceiling fan light is on. FanLinc light LED will be green
3) Press & hold FanLinc light set button until FanLinc double-beeps. FanLinc light LED will flash once & return to green; Controller will (beep)–(beep) and its LED will stop blinking
Once you’ve done that, check that the On/Off buttons properly control your fan light. Pressing and holding the On/Off buttons should also dim the light up and down.
Now don’t move that ladder, because you’ll be going up and down quite a bit to program the keypad to control the four different fan modes (three speeds and Off). Using one keypad button for each mode, follow these instructions from Smartlabs:
1) Tap FanLinc Fan set button until FanLinc beeper & LED indicate the desired fan speed. FanLinc fan LED will be in the desired state (see table below)
| Tap | Fan Speed | Beep | LED |
|---|---|---|---|
| 1st | low | Single beep | Blinks Green |
| 2nd | medium | Double beep | Slow Blinks Green |
| 3rd | high | Fast Double beep | Medium Blinks Green |
| 4th | off | None | Fast red |
2) Press & hold the scene controller set button until it beeps. Controller LED will start blinking
3) Press & hold FanLinc fan set button until FanLinc double-beeps. FanLinc will (beep)-(beep) and the LED will return to previous state; Controller will (beep)–(beep) and its LED will stop blinking
Once you’re clear of the fan and its blades, make sure the fan is on (with the pull chain or onboard switch, if it has one) and verify that each of your keypad’s fan control buttons works properly. If you want to use an additional switch, keypad, or remote to control the light and/or the fan, now’s the time to do it—before closing up the fan canopy.
No switch? No problem.
So what do you do if you don’t have a switch? There are two options here: Replace some other nearby switch in view of the fan with an 8-button Insteon Keypad or pair the Fan Controller with a Mini Remote (either the 4-scene or 8-scene versions).
If you decide to replace an existing Insteon or standard single-pole mechanical switch with an 8-button keypad, the top-left button (button A) will control the connected fixture. You can then pair any of the other buttons to the Fan Controller as you did above to control the fan light and fan speeds.
Pairing a Mini Remote with the Fan Controller is similar to pairing a keypad. Press and hold each lettered button you want to program, following the directions above to set that button to control either the light or one of the fan speeds. Do this for each button. If you’re using the 4-scene Mini Remote, you won’t need to program the “Off” speed for the fan. Press the left button on any of the fan speed buttons you’ve programmed to turn the fan off.
The Finishing Touch
When you use multiple buttons on a keypad for mutually exclusive options, you’ll want to do one of two things to make sure the lights behind the buttons make sense when you’re controlling your fan. There’s the hard way and an easy way. The hard way keeps all the button lights in sync, so as you press a button for the fan speed it will light up, and any other fan speed button lights will turn off. The easy way is to convert each of the fan speed buttons to “non-toggle” mode. In this mode, they will blink when you press them but won’t stay on to show which fan speed is active.
Below are Smartlabs’ instructions for keeping the button lights in sync. In these instructions, A/B/C/D refer to the buttons you’ve programmed to control fan speeds.
Start from the keypad with all LEDs off
Step 1: Tap the A button to turn it ON, then press and hold the set button for 3 seconds.
The A button will begin to flash.
Step 2: Next tap the set button again. (This puts the device into multi-linking mode)
The A button will start rapidly flashing in its multi scene mode.
Step 3: Next press and hold button B for 10 seconds, then button C, and finally Button D.As you hold them down you will hear a double beep or chirping sound letting you know they have been properly paired.
Step 4: Tap the A button when finished.
Repeat this process for buttons B, C, and D.
The next steps should be done with all the buttons in their OFF state.
Step 5: Tap the A button until it is in the OFF state
Step 6: Press and hold the Set button for 3 seconds
The A button will begin to flash.
Step 7: Tap the button again to put the keypad into multi linking mode.
The A button will start rapidly flashing.
Step 8: Next press and hold button B for 10 seconds, then button C, and finally Button D.
If the Buttons are backlit, simply tap them once so they turn off then press and hold for 10 seconds.
As you hold the buttons down you will hear a double beep, or chirping sound, letting you know they have been properly paired.
Step 9: Tap the A button when finished.
Repeat this process for all other buttons, starting at B, then at C, and finally at D so that all buttons will control all other buttons. This will help to make sure that the Keypad LED reflects the current fan speed.
Verify each button’s behavior after you’ve completed these steps.
The easy way is much easier. If you choose to use this approach instead, perform the following steps on each of the fan speed buttons to set them to non-toggle mode:
1) Make sure the button you want to change is currently in toggle mode. When you press and release it, the light should go on; if you press and release it again, the light should go off. If the light doesn’t stay on, you don’t need to change the button—move on to the next one.
2) Press and hold the button you want to change until it beeps. The button’s LED will begin blinking; All illuminated LEDs on KeypadLinc will brighten to 100%
3) Press and hold the button you want to change a 2nd time until it beeps a 2nd time. The button’s LED will continue blinking
4) Press and hold KeypadLinc’s Set button a 3rd time until it beeps a 3rd time. The button’s LED will stop blinking
When you’re done, test each button to make sure they’re behaving the way you expect. Each button should blink when you press it, and then it should turn off.
Spit and Glue
Reverting to this manual way of linking Insteon devices may feel kludgy, but if you don’t need or plan to automate your Insteon devices using one of the alternative control platforms, this will keep your fan working and give you the ability to control your fan from inside your home. The setup process is far more difficult than using Insteon’s old apps, but it works. Hopefully this will give your Insteon Ceiling Fan Controller a little more life, whether Smartlabs is around to support it or not.


